Equipment for Asphalt Paving: Essential Machines and Tools
Contractors value asphalt for its ability to deliver durable pavement quickly and efficiently, making it one of the most cost-effective paving solutions available. It’s also highly repairable, crack-resistant, and recyclable.
But despite its fast and affordable application, asphalt surfaces still require proper installation methods and professional-grade equipment for a successful final product. Achieving proper density, smoothness, and long-term performance depends on precise temperature control, accurate grading, and the coordinated sequence of specialized paving equipment.
Therefore, today, we will discuss the equipment necessary for professional asphalt paving. We will cover what asphalt paving is, how to install it, and which tools are essential for completing projects. Without professional equipment and experienced operators, even high-quality asphalt materials can fail prematurely.
For asphalt projects in Southern California,
contact TMC Engineering. Our team applies proven expertise, quality materials, and industry-recognized standards to every asphalt paving project. Using specialized equipment, we complete work to specification, on schedule, and engineered for long-term traffic performance.
Equipment for Asphalt Paving: Essential Machines and Tools
In this post, we’ll discuss what asphalt paving is, when it’s applied, and how it’s installed. Then, to help you understand the scope of your next asphalt project, we’re sharing a list of equipment commonly used during the paving process.
What Is Asphalt Paving?
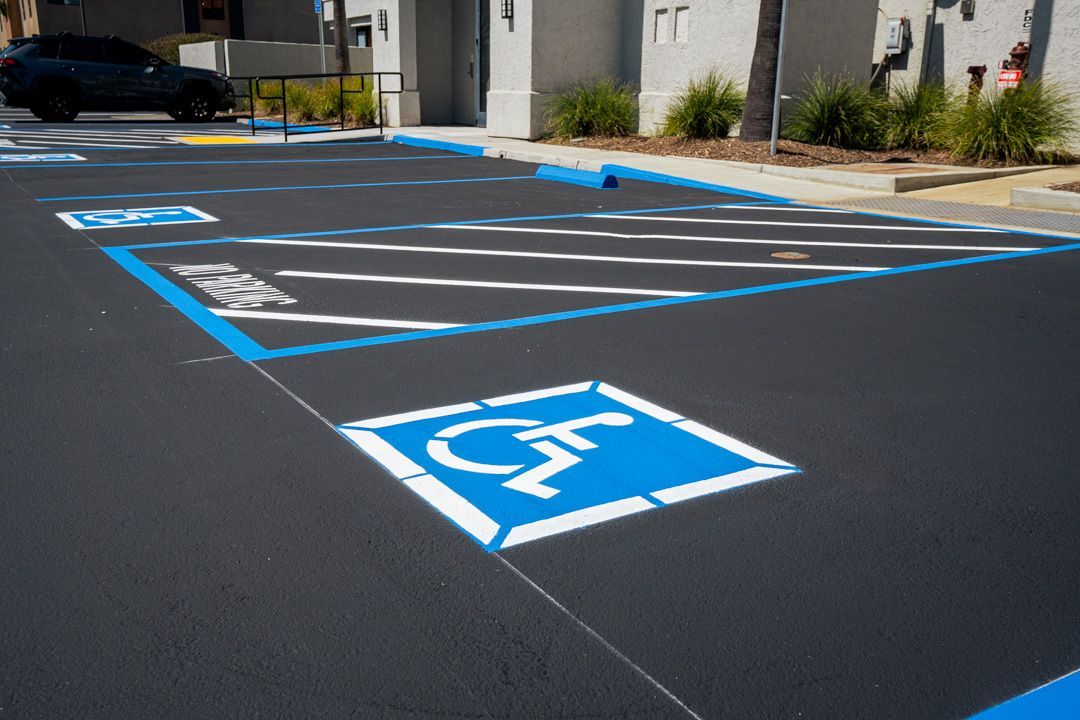
Asphalt paving generally involves applying a hot asphalt mixture over a prepared base to create a smooth, durable surface. The mixture combines aggregates, filler, and asphalt binder. Trained crews place the asphalt and compact it at high temperatures to achieve the correct grade, density, and structural strength.
You’ll find this pavement method most
often used for roads, highways, driveways, parking lots, and industrial surfaces. It’s a popular choice because asphalt is durable, yet cost-effective, crack-resistant, recyclable, highly repairable, and low-maintenance.
Below, we’ve provided additional information on asphalt material:
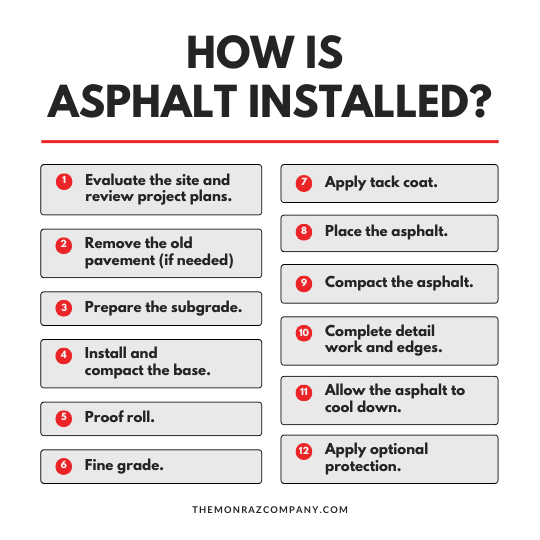
How Is Asphalt Installed?
Step One: Evaluate the site and review project plans.
Once you finalize a project plan with a contractor, field crews visit the site to verify existing conditions and confirm the design. First, they measure grades and slopes to support proper drainage. They will also mark project boundaries and locate soft subgrade areas, underground utilities, and tie-ins to existing pavement.
This site work confirms the project can be built as designed, identifies conflicts before construction begins, and verifies pavement and base thickness requirements. It will also ensure the drawings can be translated smoothly into field execution once the project begins.
Step Two: Remove the old pavement (if needed)
If there’s already pavement present, crews will remove it before proceeding. They do this using milling machines, breakers, cold planers, concrete saws, or excavation equipment, depending on the type of pavement. Once the crew has removed the material, they will then haul it off for recycling. Asphalt surface debris will ultimately be turned into recycled asphalt pavement (RAP).
For more information on the demolition process, readour guide to asphalt removal.
Step Three: Prepare the subgrade.
After crews remove the existing pavement, they fine-grade the underlying soil to achieve the required elevations and slopes. If crews encounter soft or unsuitable subgrade, they excavate the weak material. They then replace it with approved fill or base material, placing it in controlled lifts and compacting each layer to form a stable, uniform foundation for the asphalt surface.
Step Four: Install and compact the base.
Crews place the base layer over the prepared subgrade. This layer consists of aggregate and may include treatment to improve strength and performance based on the pavement’s intended use. Project plans specify the base material type according to existing soil conditions and expected traffic loads.
Contractors install the base material in controlled lifts, shape it to the required grade and slope, and compact each lift to the specified density. This layer distributes traffic loads, supports the pavement structure, and helps prevent future settlement and cracking.
Step Five: Proof roll.
Using a roller or a loaded truck, crews check the base for stability and deflection during proof rolling. During a proof roll, the equipment applies controlled weight across the surface to expose weak areas, pumping, or movement that could lead to future pavement failure.
Step Six: Fine grade.
If the base performs as intended, crews fine-grade the surface to ensure consistent drainage and uniform pavement thickness. Contractors then use motor graders, skid steers, or compact track loaders with grading attachments to perform fine grading.
Step Seven: Apply tack coat.
Next, crews spray a thin, uniform layer of tack coat over the prepared base using a spray bar attached to the asphalt distributor truck. The tack coat acts as a bonding agent, allowing the new asphalt layer to the underlying surface.
This bond prevents the asphalt layers from shifting under traffic loads, reduces slippage at joints and seams, and helps the pavement act as a single, unified structure.
Step Eight: Place the asphalt.
With the surface prepared, crews place the asphalt layers. An asphalt paver spreads the material evenly across the surface, while key components—including the hopper, conveyor, and screed—control width, thickness, and grade. As paving progresses, crews continuously check alignment and uniformity and make real-time adjustments to maintain specifications.
Step Nine: Compact the asphalt.
While the asphalt is still hot, crews use a strategic series of rollers. This increases the density, removes air voids, and smooths the final surface. Crews start with a steel drum vibratory roller, which density and places the hot mixture in position. Next, they will use a pneumatic tire roller to eliminate air voids and further compact the material. Finally, a static steel drum roller will remove roller marks, smooth the surface, and seal the mat.
Step Ten: Complete detail work and edges.
After primary paving and rolling, crews complete detail work in areas that large machines cannot reach. Using hand tools such as asphalt rakes, lutes, shovels, and hand tampers, they shape and compact asphalt around curbs, structures, utility covers, and drainage inlets. Crews also use plate compactors or small walk-behind rollers to achieve proper density along edges and in confined spaces.
In addition to structural performance, this step focuses on appearance and finish. Crews clean up joints, straighten edges, refine tie-ins, and smooth transitions where new asphalt meets existing pavement. This final detailing improves surface uniformity, visual consistency, and overall curb appeal while ensuring proper drainage and functionality.
Here’s more information on
asphalt edging options.
Step Eleven: Allow the asphalt to cool down.
After compaction, the asphalt surface must cool and gain strength before crews open it to traffic. As the material cools, the asphalt binder stiffens and locks the aggregate in place, allowing the pavement to carry vehicle loads without shifting or deforming.
Cooling time depends on several factors, including pavement thickness, ambient air temperature, wind, and sun exposure. Thicker sections and warmer conditions typically extend cooling time. Crews monitor surface temperatures and site conditions to determine when the pavement can safely open to traffic without risking rutting, scuffing, or surface damage.
Step Twelve: Apply optional protection.
Once cured (often weeks later, depending on mix and conditions), the surface may be seal-coated and striped for protection, appearance, and traffic flow. At TMC Engineering, we recommend asphalt seal coating to protect the pavement from oxidation, moisture intrusion, and premature surface wear.
In addition to seal coating, visit “What Is an Asphalt Overlay?” to learn more about additional protective treatments.

What Are the Common Equipment Used for Asphalt Paving?
Milling Machine
A heavy machine designed to remove existing asphalt to a controlled depth
- Stage: Pavement removal (Step Two)
- Uses: Removes worn pavement, corrects surface elevations, and prepares the surface for repaving
- Common Tools: Rotating cutting drum, conveyor belt, depth controls
- Why It Matters: Creates a clean surface and allows crews to recycle reclaimed asphalt pavement (RAP)
Cold Planer
A smaller, more precise milling machine or attachment used for detailed asphalt removal.
- Stage: Pavement removal (Step Two)
- Uses: Performs shallow cuts and targeted removal in tight or sensitive areas
- Common Tools: Cutting drum, adjustable depth controls
- Why It Matters: Allows accurate removal without damaging the surrounding pavement
Concrete Saw/Asphalt Saw
A cutting tool used to create clean, defined edges in existing pavement
- Stage: Pavement removal and detailing (Steps Two and Ten)
- Uses: Saw-cuts pavement for removals, tie-ins, joints, and clean transitions
- Common Tools: Diamond blades, walk-behind or handheld saws
- Why It Matters: Produces straight edges and tight joints that improve both performance and appearance
Skid Steer or Front-End Loader
Versatile machines used to move and manage materials across the job site
- Stage: Site prep, base installation, and paving support (Steps Two–Six)
- Uses: Load, transport, and spread asphalt, base material, and debris
- Common Tools: Buckets, forks, grading blades
- Why It Matters: Keeps paving operations efficient and materials moving on schedule
Dump Trucks
Trucks for hauling bulk paving materials to and from the site
- Stage: Material transport throughout the project (Steps Two, Four, and Eight)
- Uses: Deliver hot mix asphalt, remove milled material, transport aggregate base
- Common Tools: Insulated truck beds, hydraulic lift systems
- Why It Matters: Maintains asphalt temperature and supports continuous paving operations
Motor Grader
A precision machine to shape and smooth the base to exact elevations and slopes
- Stage: Fine grading (Step Six)
- Uses: Trims high spots, fills low areas, and establishes proper drainage and pavement thickness
- Common Tools: Adjustable grading blade, laser, or GPS grade controls
- Why It Matters: Ensures uniform asphalt thickness and proper drainage across the paved surface
Asphalt Distributor
A truck-mounted system designed for uniform tack coat application on large areas.
- Stage: Tack coat application (Step Seven)
- Uses: Applies tack coat evenly across wide paving surfaces
- Common Tools: Heated tank, calibrated spray bar, pump system
- Why It Matters: Ensures consistent bonding between pavement layers
Tack Coat Sprayer
Equipment used to apply a thin bonding layer before asphalt placement.
- Stage: Tack coat application (Step Seven)
- Uses: Sprays tack coat to bond new asphalt to the base or existing pavement
- Common Tools: Spray wands, pumps, hoses
- Why It Matters: Prevents layer separation and premature pavement failure
Asphalt Paver
A self-propelled machine that evenly distributes hot-mix asphalt across the prepared surface
- Stage: Asphalt placement (Step Eight)
- Uses: Spreads, levels, and pre-compacts asphalt to the specified width, thickness, and grade
- Common Tools: Hopper, conveyors, augers, screed
- Why It Matters: Controls mat uniformity, smoothness, and thickness before rolling begins
Hand Tools
Manual tools are used for shaping, detailing, and final surface adjustments
- Stage: Asphalt placement and detailing (Steps Eight and Ten)
- Uses: Adjust asphalt placement, clean joints, and refine edges and transitions
- Common Tools: Asphalt rakes, lutes, shovels, hand tampers
- Why It Matters: Provides precision and clean cosmetic results
Asphalt Rollers
Heavy machinery for compacting asphalt at various stages of paving
- Stage: Asphalt compaction (Step Nine)
- Uses: Increase density, remove air voids, and smooth the asphalt surface
- Common Tools: Vibratory steel drums, pneumatic rubber tires
- Why It Matters: Proper compaction directly affects pavement strength and longevity
Plate Compactor
A small vibratory machine used in confined or detailed areas.
- Stage: Detail work and edges (Step Ten)
- Uses: Compacts asphalt and base along edges, joints, and tight spaces
- Common Tools: Vibratory plate, engine drive system
Why It Matters: Achieves proper density where rollers cannot reach
A successful asphalt project requires professional-grade equipment.
Asphalt paving is only as good as the equipment and expertise behind it. From precise pavement removal to final compaction and detailing, every stage of the process relies on specialized machines and experienced crews working in coordination.
For asphalt projects in Southern California, trust TMC Engineering. We bring the right equipment, proven processes, and industry standards to deliver durable, high-performance pavement that lasts.
Contact our team to discuss your next asphalt paving project.